五月 21
剛剛才發現原來CentOS 5.3早在3/1就出來了, 但是國內的許多ftp server 竟然都還沒放上去.
想抓5.3的朋友, BT抓比較快啦.
CD版:
http://mirror.centos.org/centos/5.3/isos/i386/CentOS-5.3-i386-bin-1to6.torrent
http://mirror.centos.org/centos/5.3/isos/x86_64/CentOS-5.3-x86_64-bin-1to7.torrent
DVD版:
http://mirror.centos.org/centos/5.3/isos/i386/CentOS-5.3-i386-bin-DVD.torrent
http://mirror.centos.org/centos/5.3/isos/x86_64/CentOS-5.3-x86_64-bin-DVD.torrent
真想把我的Server 更新到5.3版. 只是想到要重裝就很累.
不過, 用下列指令就可以輕鬆的把我的CentOS 5.2 升級到5.3. 免去重裝的辛苦.
(1) 先用 ‘yum list updates’ 來取得最新的package list.
(2) 然後執行 ‘yum update’ 來更新所有的套件.
(3) 等到更新完後, 執行下列指令確定是否更新到5.3
‘rpm -q centos-release’
若一切都沒錯的話, 應該會看到如下字串:
‘centos-release-5-3.el5.centos.1′
以上! 搞定~~
五月 18
6年前, 當我用過BeyondCompare這套Diff軟體後, 在Windows中, 再也沒有任何一套Diff軟體, 即使是免費的Diff軟體, 也無法讓我看的上眼. 因為BeyondCompare實在太好用了.
Continue reading »
五月 04
長久以來, 我一直在尋找好用且免費的Editor.
我目前在用的Editor是Jedit, 它幾乎是我心中最完美的Editor.
可以在Windows/Linux/Mac 中使用.
只可惜的是, 它有點慢, 在一些慢速的CPU上, 如Atom, 跑起來顯得有點吃力.
還有就是, 在Linux環境下, 總覺得穩定度似乎得再加強(或許是Sun JRE的問題??).
因此, 我一直再尋找Linux能跟Jedit一樣好用的軟體.
曾經用了一套MadEdit, 算是不錯了.
但是在捲動畫面的時候, 還蠻lag的.
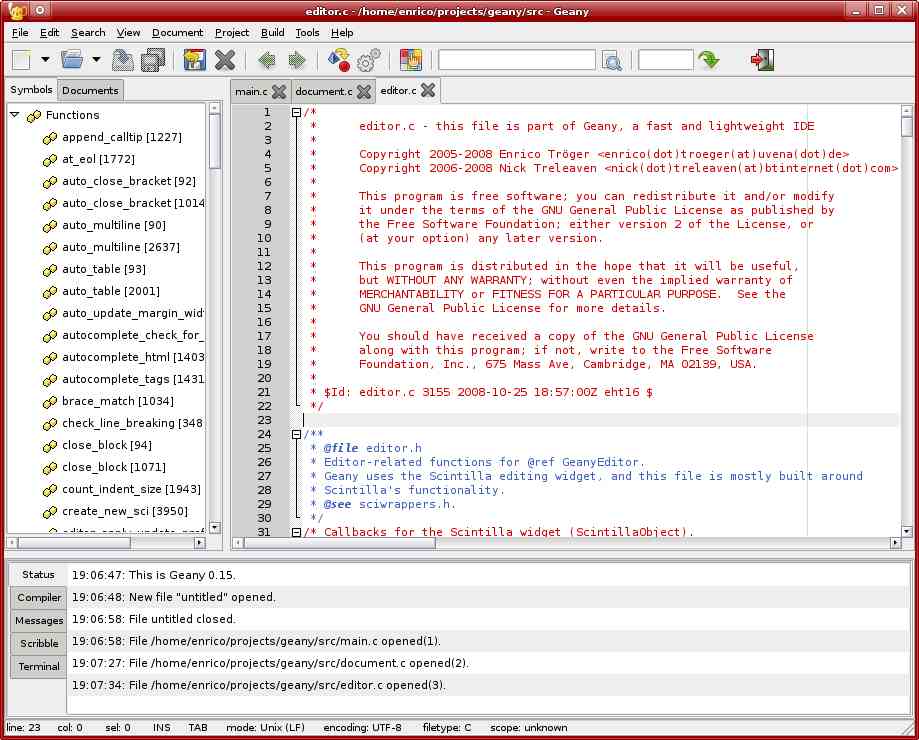
OK! 回歸正題, 剛剛又看到一套Open Source的Editor: Geany
畫面不錯, 如下:

有Tab, 以及畫面左邊有Function List, 正是我所需要的功能. 雖然目前只到0.17版, 但是有空一定要裝來玩玩.
一月 19
最近不知為何, 在好幾台server 中執行yum , 都會失敗.
出現如下的訊息:
Loading "installonlyn" plugin
rpmdb: Lock table is out of available locker entries
rpmdb: Unknown locker ID: xxx
......
雖然server重新開機後可解決此狀況. 但是並不是所有的server都允許常常重開機.
後來找到解法:
參考下列網頁
http://linux.derkeiler.com/Mailing-Lists/Fedora/2008-04/msg00460.html
1) Become superuser
2) Make sure no instances or 'rpm' or 'yum' are running
3) rm /var/lib/rpm/__db.*
4) rpm --rebuilddb
看來好像rpm 的設計有點爛 
一月 05
以下文章來至於http://edwardhuang.pixnet.net/blog/post/15645490
========================================================================
在 solaris 中,並不像其它的 UNIX 系統一樣,要利用 NFS 來 export硬碟是去修
改 /etc/exports. 而是要去修改 /etc/dfs/dfstab 這個檔. 設定的方法如下:

利用 share 來 export 硬碟,share 的參數如下:

Attrib         Description
===============================================
-ro          Export read-only, or of used in the form -ro=list, restrict
             access only for the listed hosts.
-rw          Export read-write, or if used in the form -rw=list, allow
             writing only by the listed hosts.
-root=list   Lists hosts permitted to access this filesystem as root. Other-
             wise, root access from a client is equivalent to access by the
             user nobody (usually UID -2).
-anon=n      Specifies UID used for requests coming from an unknown user.
             If not specified, defaults to nobody.

以下舉一個例子,說明 /etc/dfs/dfstab 的寫法.

#       Place share(1M) commands here for automatic execution
#       on entering init state 3.
#
#       Issue the command '/etc/init.d/nfs.server start' to run the NFS
#       daemon processes and the share commands, after adding the very
#       first entry to this file.
#
#       share [-F fstype] [ -o options] [-d ""] [resource]
#       .e.g,
#       share  -F nfs  -o rw=engineering  -d "home dirs"  /export/home2

share  -F nfs  -o rw=sparc,root=sparc  -d "File System" /
share  -F nfs  -o rw=sparc,root=sparc:sparc1:sparc2  -d "User Directory" /usr

1.第一行 share 是把 / (root) share 給一台叫 sparc 的機器,且權限為可以 rw.
2.第二行同樣是把 /usr 這個目錄 share 給 sparc,sparc1,sparc2 這三台機器,
  權限亦為 rw.

 exp.    share  -F nfs  -o rw=sun2,root=sun2  -d "sun1_home" /export/home
  or      share -F nfs -o rw,anon=0 /export/home

修改完之後,以 root 的身份執行 shareall 即可.

檢查 /etc/dfs/sharetab 是否編輯成功
還有另外一篇http://edwardhuang.pixnet.net/blog/post/15645154
solaris NFS file server
1.How to Start and Stop NFS server
  #/etc/init.d/nfs.server start
  #/etc/init.d/nfs.server stop
2.開機自動分享nfs的檔案系統
修改
/etc/dfs/dfstab檔案
#vi /etc/dfs/dfstab
會看到以下畫面,#是註解

#    Place share(1M) commands here for automatic execution
#    on entering init state 3.
#
#    Issue the command 'svcadm enable network/nfs/server' to
#    run the NFS daemon processes and the share commands, after adding
#    the very first entry to this file.
#
#    share [-F fstype] [ -o options] [-d "<text>"] <pathname> [resource]
#    .e.g,
#    share  -F nfs  -o rw=engineering  -d "home dirs"  /export/home2
#   上面有簡單的說明,以下兩行是自己設定的
share -F nfs -o rw,anon=0 -d "nfs_share" /export/home/nfs
share -F nfs -o ro,anon=0 -d "mp3_share" /export/home/samba

3.開機後手動分享檔案的方法
#share -F nfs -o rw,anon=0 -d "nfs_share" /export/home/nfs
#shareall
這樣就可以將檔案分享出去了

4.mount 已經分享的NFS檔案系統
#mount -F nfs ipaddress:/patch mount point
example:
#mount -F nfs 10.0.0.1:/export/home /mnt

4.取消分享的方法
#unshare -F nfs /mnt
取消所有的分享
#unshareall

5.查看分享了哪些檔案
查看server本身有哪些分享

#share
查看別台server 有哪些分享
#dfshares -F nfs ip address or hostname
example
#dfshares -F nfs 192.168.11.200
四月 15
因為某台server 沒裝sendmail 和postfix, 所以一些系統的log message 無法寄出去.
所以我改用了』command line email『來寄信.
大部分的情況都可以解決, 但是logwatch就是寄不出去.
搞了好久, 設定檔改成如下, 終於寄出去了:
修改 /etc/logwatch/conf/logwatch.conf (或 /etc/log.d/conf/logwatch.conf)
#MailTo = 『abc@xxxx.com.tw』 <— 可以不用設定啦
mailer = 『/usr/local/bin/email -s the_title_you_want abc@xxx.com.tw』 <– 強迫指定e-mail and title
搞定!!
PS: 好像是某一版的Logwatch 才有此問題的……anyway, 搞定就好!!
四月 14
若在shell script中, 需要用command line 來寄信, 常用的方式就是用』mail』 指令來發信.
但是因為某些原因, 要利用外部的smtp servers來發信, 而且外部的smtp server通常需要使用者認證才能寄信.
這時』mail』指令就派不上用場了.
後來發現可以用這個指令』email』 來寄信.
而且可以將設定檔設在~/.email.conf 中, 若此檔不存在, 他會參考/usr/local/etc/email/email.conf檔,
這樣就搞定一切啦.
好像還可以利用gmail來幫你發信喔.
改天可以試試看喔.
自問: 當sendmail 或mail 不能使用的時候, logwatch 該如何寄出log file呢?
自答: vi /etc/logwatch/conf/logwatch.conf (或 vi /etc/log.d/conf/logwatch.conf)
MailTo = abct@def.com <--- 設定要寄給誰
mailer = /usr/local/bin/email <--- 改用email 指令來寄信
(2008/04/15 註: 這樣還是寄不出去, 解決方式參考這裡)
還有一點就是, 安裝email 程式, 其default 是裝在/usr/local/bin/email, 而config 檔是在/usr/local/etc/email/email.conf
正常使用, 不會有任何問題, 但是我在/etc/crontab 中執行一個script, 其利用email來寄出信件, 但是卻怎樣也寄不出去.
搞了半天, 才知到路徑出了問題, crond 並沒有設定PATH到/usr/local/bin, 所以找不到email這程式.
所以只好用如下方式解決:
ln -s /usr/local/bin/email /bin/email
三月 14
參考:http://www.ucs.ed.ac.uk/fmd/unix/docs/mail/forwarding-unix.html
在home directory 中增加一個』.forward』 檔.
在檔案裡面寫入想要轉寄的e-mail即可.
如:
abc@qqyy.com.tw
一旦轉寄成功後, 信件自動會被移除.
若仍想保留信件, 則可以如下修改.
假設這個使用者的username 是 hao
則可寫成如下:
abc@qqyy.com.tw, \hao
十二月 02
MAC OS 10.5 中X11 修正redraw 的問題. (PS: 解決了我用cutecom 的顯示問題)
原文參考於http://ubb.frostyplace.com/viewtopic.php?p=169173
10.5底下Redraw問題解決辦法,參考 http://www.x.org/wiki/XDarwin 的Binary installation
開啟Terminal,一行行拷貝底下指令,每換一行記得按enter
1.替代掉原來的XQuzrtz
curl -LO http://people.freedesktop.org/~bbyer/x11app/xorg-server-1.2a11/Xquartz-1.2a11.bz2
bunzip2 Xquartz-1.2a11.bz2
sudo install -b Xquartz-1.2a11 /usr/X11/bin/Xquartz
2.更新libX11
curl -LO http://people.freedesktop.org/~bbyer/x11app/libX11.6.dylib.bz2
bunzip2 libX11.6.dylib.bz2
sudo install -b libX11.6.dylib /usr/X11/lib
3.更新/Applications/Utilities/X11.app
curl -LO http://people.freedesktop.org/~bbyer/x11app/X11_launcher.bz2
bunzip2 X11_launcher.bz2
install -b X11_launcher /Applications/Utilities/X11.app/Contents/MacOS/X11
4.更新xterm
curl -LO http://people.freedesktop.org/~bbyer/x11app/xterm.bz2
bunzip2 xterm.bz2
sudo install -b xterm /usr/X11/bin

